Yammy Gobblers

Yammy Gobblers - Yams Dressed Up Like Turkeys

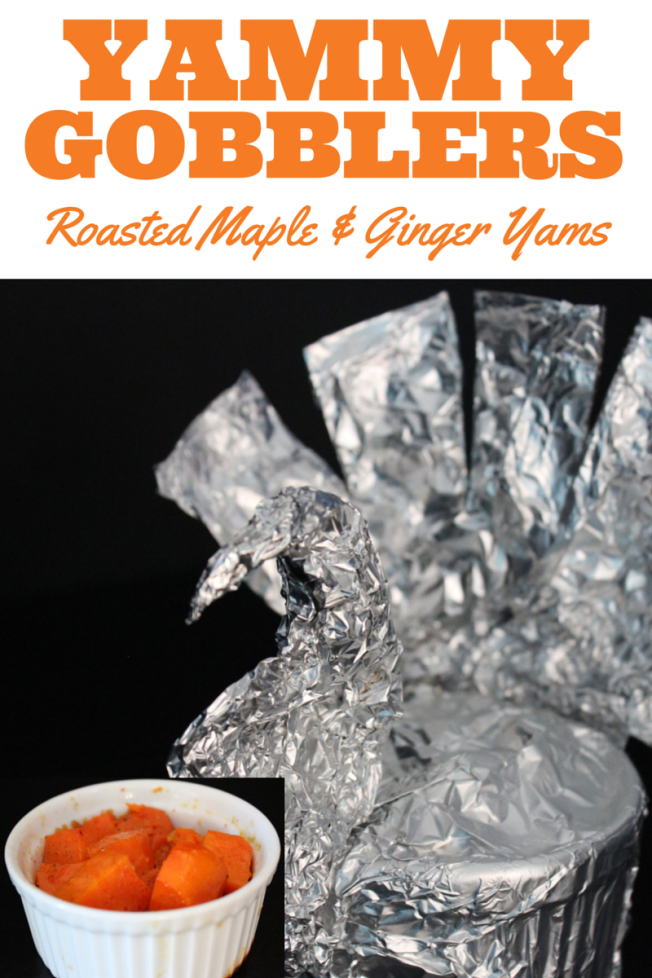
We’re sure every family has a Thanksgiving tradition — whether it’s your Aunt Carol’s Walnut-Celery Jello Ring or your Mummy’s Famous Pecan Pie.  At Chef Terri’s house, the Yammy Gobblers take center stage alongside the Stuffed Pumpkin and the turkey (of course).

Every tradition has a beginning.  These roasted yams, wrapped in foil shaped to resemble a turkey, were inspired from a childhood memory:

Imagine it’s 1977, and your 7-year-old self has just had dinner with your parents at Smith & Wollensky in New York.  You weren’t able to finish your entire meal, so your friendly waiter offers to pack up your leftovers into a Bowser Bag.  You nodded, from the goading of your parents; and your obedience was rewarded with the presentation of your leftovers wrapped in aluminum foil shaped like a bright and shiny magical swan.  Breathless, you thanked your waiter for the lovely and elegant prize which you cradled in your hands all the way home to place in the fridge.  (and then the next day you wept bitterly when you discovered your dad satisfied his midnight craving by finishing off your meal, and left the ripped up remains of the beautiful swan on the counter for you to find in the morning).

But we digress.

Chef Terri pays homage to her beloved foil swan by featuring Yammy Gobblers on the Thanksgiving Feast menu.  You can use any roast yam or sweet potato recipe you like; Chef Terri roasts yam with aromatic ingredients like orange zest and cinnamon in ceramic ramekins and wraps the packages up in foil shaped like turkeys.  The presentation can be downright adorable.  According to one family member, it’s not Thanksgiving unless the Yammy Gobblers are served.

Sure, it’s cheesy, but it’s tradition.  Who’s going to mess with tradition?


Yammy Gobblers

Serves 6 to 8

4 medium-sized yams, peeled and 1/2-inch diced

Zest and juice of 2 navel oranges

1 tablespoon grated ginger

1/4 cup Maple syrup (grade B – or the darkest color you can find)

1 stick (8 tablespoons) unsalted butter, softened to room temperature

pinch each of kosher salt and freshly ground black pepper

1/2 teaspoon ground cinnamon

pinch freshly grated nutmeg

Special Equipment:

  • 6-8 4-ounce ramekins
  • heavy duty aluminum foil
  • baking sheet


Preheat the oven to 425 ℉

Butter each ramekin all over the insides and bottom and set aside.

In a mixing bowl, toss the yams with the orange juice, zest, ginger, syrup, salt, pepper, cinnamon and nutmeg until the yams are well coated.  Evenly divide the mixture among the prepared ramekins.

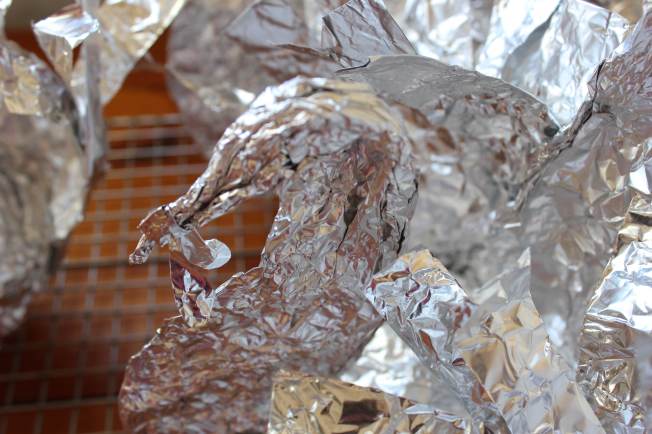
Wrap each ramekin with a sheet of foil, folding and crimping each end to represent the turkey’s head, neck and tail.  Cut the fringes on the tail to represent the tail feathers.

Place the turkeys on a baking sheet and bake for 20 – 30 minutes, or until fragrantly caramelized.  The yams are done with a knife inserted into one slides in with no resistance (though you’ll have to unwrap a sacrificial turkey to test that!)

Allow the turkeys to cool slightly for about 15 minutes before serving (if the turkeys are too hot, the steam escaping from them when you open them may burn you).  Let each guest unwrap his own yammy gobbler.  The aroma from the steam coming out is quite heady.


Yams in Ramekins Dressed Up Like Turkeys with Dear Martini


Baked Alaska – A flaming dessert for Valentine’s Day

Dear Martini Baked Alaska

Q:  What’s sweet, frozen and yummy… and set on fire?

A:  Baked Alaska!

Originally, the chef of New York’s Delmonico’s Restaurant created this show-stopping flaming dessert in 1867 to honor the United States acquisition of Alaska.  Though the chef didn’t invent the flambéed ice cream cake, Delmonico’s is credited for coining the name “Baked Alaska” to the delight of generations of ice cream cake enthusiasts.

If you’re in the habit of making a special dessert for your sweetheart on Valentine’s Day, chances are sooner or later you’re going to run out of ideas that have to do with chocolate.   We’ve found Baked Alaska usually wins over even the diehard chocoholics.  All you need to do is assemble your favorite ice cream (we love strawberry!) on top of your favorite cake and slather or pipe the entire thing with fluffy meringue.  Then, when it’s time to serve, ignite an ounce of your favorite eau de vie (any flavor that pairs with your ice cream, as long as it is at least 40% alcohol by volume or higher) and carefully drizzle the flaming liqueur over the dessert.  If your sweetheart hasn’t fallen for you by now, this flaming dessert will definitely seal the deal.

Baked Alaska

Makes 6-8 individual servings

1 recipe Yellow Cake, baked into a 9X13″ pan (or, you can use any cake you like – even frozen pound cake!)

1 quart of your favorite ice cream

2 1/2 cups granulated sugar

1 cup water

8 large egg whites, brought to room temperature

1/4 cup Kirsch (or any of your favorite distilled eau de vie – must be at least 40% alcohol by volume) 

Special Equipment:

Round cookie cutter, 3 inches in diameter

Large ice cream scoop

Piping bag fitted with star tip

Kitchen torch

Small, long-handled saucepan

Long reach (fireplace) match

Punch out rounds of cake and arrange on a sheet pan.  Freeze for about 30 minutes.  Scoop out the ice cream and place one mounded scoop on top of each cake round.  Return to the freezer and freeze for 30 minutes, or overnight.

Prepare the meringue by first cooking the sugar and water together until the sugar reaches 240ºF.  Whip the egg whites until soft peaks and slowly pour the syrup in and whip until stiff peaks.

Pipe the meringue in decorative swirls around each ice cream cake.  The fluffier the better. Return the cakes to the freezer and freeze for 1 hour or overnight.

Just before serving, lightly torch the surface of the cakes with a kitchen torch.  Transfer a cake to an oven-proof plate. Pour the kirsch into a small long-handled saucepan and heat over the stove for a few moments, just until the Kirsch is hot.  Carefully ignite the Kirsch in the pot with a match.  While the Kirsch is flaming, drizzle over the cake and allow the liqueur to flame out on its own before enjoying!

IMG_0916

Here are some helpful videos – just click on the photo and jump to the video:

Dear Martini How to Make Italian Meringue VideoDear Martini How to Fill a Pastry Bag VideoDear Martini How to Use a Star Tip Video

What’s a Salty Fig?

Salty Fig is a great new website and friendship we are pleased to introduce you to. Salty Fig’s mission is: “Less Time Looking More Time Cooking”; with a mission statement aligned so perfectly with ours (Recipe Rookies into Recipe Rockstars) we couldn’t help but partner up.  Salty Fig is a great place to  collect, organize and share recipes, food photos and create recipe eBooks while connecting with food friends.  And now in the 2.0 version of their website you can collect our videos along with your recipes.  Checkout their new site!

Salty-Fig-Home-Page

Here’s an excerpt of the fun interview we did with Suzanne Florek  Salty Fig’s foundersuzanne floreck

Suzanne: What is your favorite food memory?

Terri:  My favorite food memory is the one food memory that inspired my life-long passion for baking.  I was 6, attending an afternoon party with my mom at her friend, Lana’s house.  Lana made creampuffs that looked like swans, and she was kind enough to let me dust them with powdered sugar.  I had never seen anything so beautiful before in my life.  It was the first time I ever experienced the idea that food could be artful and delicious.

Mia:  A favorite food memory is a freezing cold January morning while I was living in Italy.  We were making sausages and my friend Itala roasted freshly cut pork chops in her fireplace grill with just a little olive oil, salt and pepper.  Eating pork chops and drinking wine at 8 a.m.! My mouth waters every time I think back to that day. 

Suzanne:  If a great chef were to cook you a birthday dinner, what would the menu be?

Terri: Honestly, my idea for a birthday dinner involves a menu from Judy Rodgers’s Zuni Café.  I’d start with a burrata and persimmon salad, then move to a dozen oysters, then have a gnocchi course, then the roast chicken (of course!) and finish with a pavlova with blood orange sorbet. 

Mia:  My last big birthday we celebrated at Chez Panisse and serendipitously the dessert was a Pear and Huckleberry tart. I grew up in California so huckleberries are near and dear to me.  Best “birthday cake” I’ve ever had! 

Suzanne:  What is your most bizarre food experience?

Terri:  Eating a live shrimp.  About 10 years ago, I was at my local farmers market with my friends.  We met a vendor selling freshly caught wild shrimp.  The guy grabbed a shrimp from the tank, ripped off the head and legs and handed it to me, still alive.  He encouraged me to try it raw (and alive).   It tasted briny and shrimpy and I spent the next four days in a panic that I was going to manifest symptoms of a food borne illness. 

Mia:  Half a lamb’s head arrived on my plate.  It was one of those situations where I couldn’t refuse it, so I ate it.  I somehow managed to ignore the eye starring at me, but the jawbone and the teeth (you heard that right – teeth!!) were hard to get around. 

Suzanne: What is your favorite food moment in a …. Book/movie/TV Show/song about food?

Terri:  Oh my god – too many to mention.

Book(s):  I grew up reading the Little House book series.  I read them over and over again, and the chapters describing their food have stayed with me to this day.  I actually have an idea to write a paper on how I thought Laura Ingalls Wilder was one of the first food writers of our time.  A few of the moments that stand out for me:  how Laura described tasting lemonade for the very first time, making maple candy by cooling them in freshly scooped snow, simmering baked beans and making an “apple pie” from an unripe, green pumpkin.

Movie:  This isn’t really a fair question, because Mia and I have both taught
“Movie Night” classes where we screen a foodie movie, then make a dinner inspired by the food in the movie.   I’ll let Mia describe the movies she’s screened (because she did the BEST ONES!  J).  My favorite Movie Night was “Ratatouille.”  I served fresh popcorn drizzled with clarified butter and herbs de provence, thyme and Gruyere gougeres, roast chicken and ratatouille presented in the exact spiral pattern in the movie.  We’ve also done “My Big Fat Greek Wedding,”  “Moonstruck,” “Marie Antoinette,”  “Julie and Julia,” and OMG too many more to mention.

TV Show:  I’m a sci-fi fan.  One of the shows I watched religiously as a kid was Battlestar Galactica.  There is scene where the kids from the Galactica spaceship have waffles for the first time on Earth.

Song: “On top of spaghetti”

 Mia:  She took all the good ones!  Lol.  Here are a couple more that come to mind.  “Bella Martha” Mostly Martha the original version. During the opening credits we see Martina Gedeck putting on her apron and going about setting up her kitchen before dinner service.  There is something so authentic about this moment (meditational) that I identify with and love…something cooks all around the world are doing right now.

I just saw a fabulous film “Jiro Dreams of Sushi” a touching story about  Jiro Ono who is considered by many to be the world’s greatest sushi chef and his sons. Inspiring story of what it is like to live life as a cook and the photography is amazing and lyrical… you can almost see the sushi sigh. 


For something a little less esoteric – I love when Toto steals the hot dog from Professor Marvel in the Wizard of Oz and Aunt Em’s crullers look fantastic!

For the rest of the interview checkout: www.saltyfig.com

Piece of Cake

Piece of Cake | www.dearmartini.wordpress.com

First things first — you do not need to make your cake look like a store-bought cake with the fanciest of decorations (sigh of relief heard ’round the world.) Focus on making your cake TASTE great and the looking-good will follow. In pursuit of making cake baking easier, we’ve outlined some of the tips and techniques to help you avoid the common pitfalls novice bakers face.

MAKE:

Adjust the rack before you light the oven. We’ve all opened up the oven to find the rack in the wrong place. Bake cakes (unless instructed otherwise) on the center rack for even heat distribution.

Bring ingredients to room temperature | www.dearmartini.wordpress.comBring all refrigerated ingredients to room temperature. It takes about 20-30 minutes for most ingredients to reach room temp about 65-70 degrees. Eggs are always large (not extra-large) and butter is always unsalted unless your recipe states otherwise.

Cold eggs are easier to separate. If you are an egg novice — try separating while cold and then bring them to room temperature.

Take the time to prepare your pans properly. It sincerely sucks when you’ve spent a lot of time making a cake only to have a major fail when trying to get it out of the pan.

Use the freshest ingredients available. This sounds like it goes without saying, but before you start a baking project, the day before double-check your expiration date on the baking powder and, if you bake infrequently, that your flour is not a million years old. Rancid flour (develops a sour-off taste) and baking powder that is old will ruin all of your hard work. It’s also the time to double-check that you have all the ingredients you need in your pantry so you don’t have to make a middle-of-the-project run to the store. Having all of the proper ingredients at hand will also prevent you from falling to the temptation of substituting ingredients or using less of an ingredient. Baking is an exact science and making substitutions is the purview of the experienced baker ONLY.

Measure your ingredients carefully. For liquid ingredients always use a liquid measuring cup (one with a spout.) For dry ingredients use the dip and sweep method. For the most accurate results, experienced bakers weigh all of their ingredients with a digital kitchen scale.

No skimping on the sifting! Sifting aerates the ingredients and ensures that all of the dry ingredients are thoroughly combined. If you don’t have a sifter (we never use one) you can use a wire mesh strainer.

Take your time when combining butter and sugar. It takes about 5 minutes to beat or cream these ingredients together. Creaming adds tiny air pockets to your batter and is the secret to a light cake.

Incorporate dry ingredients on low or by hand to avoid too much gluten development. Recipes always say don’t over beat… this is what they are referring to. Gluten development results in tough, dry cake.

Whip egg whites to the proper consistency as called for in the recipe. Need help with being able to tell soft peaks from firm peaks be sure to watch the video!

BAKE:

Cakes Need Space

Baking 2 cakes? Allow enough room in between (a couple inches — pans should not touch) and on all the sides for proper heat circulation.

The Big Switch | ww.dearmartini.wordpress.com

twist the pans for even baking | www.dearmartini.wordpress.com

When you start to smell a cake, that’s usually a good indicator that it is done. But that’s not always the case. To check if your cake is done insert a toothpick into the center of the cake. If the toothpick comes out with just a few dry crumbs, the cake is done. If the toothpick is moist, continue baking and check again after 5 minutes. Resist the urge to open and close the oven multiple times! Every time you open the oven you lose heat from the oven.

COOL:

Unless otherwise stated in the recipe, allow cakes to cool 10 minutes in the pan on a wire rack. Remove cake from the pan and completely cool on the wire rack.

NEVER try to ice/frost a warm cake. Cakes need to be completely cool or the frosting will melt.

Enjoy:

send us your cake photo

Wishing you many great cakes and happy baking!

Mia and Terri xxoo

Ps. We love hearing from you and would love to see photos of your cakes. Send us a photo and we will share!

Strawberry Shortcake

Everything you need for Strawberry Shortcake | www.dearmartini.wordpress.com

Shortcakes, berries and cream are all you need for a fabulous dessert!

Nothing indicates that Spring is finally here like the arrival of strawberries!  If you haven’t already made this classic all-American dessert yet, now’s your chance!

Let’s say you’re invited to a friend’s house for a weekend backyard party… and you want to contribute a dessert to the party but don’t know what to make? Herein lies your salvation. Bring strawberry shortcake! It’s everyone’s favorite! Bring the components with you in separate containers, and assemble just before serving.

There are only three components to this dessert: strawberries, whipped cream, and lightly sweetened biscuits. Follow our how-to videos to help you along with preparing each component. As always, we’ve created a portfolio of all relevant how-to videos on our Vimeo Channel: http://vimeopro.com/dearmartini/strawberry-shortcake. We hope this will earn its place in your arsenal of go-to dessert recipes!

Strawberry Shortcake Recipe | www.dearmartini.wordpress.com

Strawberry Shortcake

Serves 8 to 10

1 recipe shortcakes, recipe follows

INGREDIENTS:

DIRECTIONS:

Bake the shortcakes according to recipe and set aside.  While the shortcakes are baking, prep the strawberries for macerating and whip the cream. Serve immediately.

If you are taking the shortcakes to an event, it’s best to assemble the dessert on site.  Macerate the strawberries and whip the cream immediately before serving.

To assemble for serving:

Slice the biscuits in half and warm them in an oven set to 250°F for 10 minutes (this step is optional, but the biscuits are awesome when they are warmed!)

Arrange the bottom half of a biscuit on a plate. Place a generous spoonful of the macerated strawberries and the resulting syrup on the biscuit. Spoon a generous dollop (or quenelle) of whipped cream over the strawberries. Top with the top half of the biscuit. Repeat with the remaining biscuits. Garnish with either threads of lemon zest or a fanned strawberry. Serve immediately.

Shortcakes

Makes 12 biscuits

* in this recipe, the base recipe for the biscuits is derived from our scone recipe. We like to make our own acidulated milk instead of using buttermilk from the store; so if you wish to use buttermilk, substitute ½ cup for the lemon juice and whole milk.

INGREDIENTS:

  • 2 teaspoons lemon juice or cider vinegar
  • ½ cup whole milk
  • 1 ½ sticks cold unsalted butter, cut into small pieces
  • 2 cups plus ¼ cup all-purpose flour for dusting
  • 2 tablespoons sugar
  • 1 tablespoon baking powder
  • 1 teaspoon kosher salt
  • 2 large eggs, lightly beaten
  • 1 egg, beaten for egg wash
  • 1 tablespoon turbinado sugar (or granulated sugar)

DIRECTIONS:

Preheat the oven to 375˚F.

Mix the lemon juice and milk together and let it stand in the fridge for as long as it takes to prepare the rest of the recipe. If you are using ½ cup buttermilk for this recipe, eliminate this step. Cube the butter and keep in the freezer until you are ready to use them.

In a large bowl, mix the flour, sugar, baking powder and salt with a wooden spoon. Add the butter. Cut the butter into the flour using a pastry blender or break up the butter into the flour by rubbing the butter and flour together between your fingers. Do this very quickly and randomly. You should still have lumps of butter varying from small (pea-sized) to large (blueberry sized). Do not let the butter get soft. If it does, return the bowl to the fridge for a few minutes.

Combine the eggs and milk mixture together and add to the flour mixture. Stir gently with a wooden spoon until the dough forms a shaggy, lumpy mass. It’s ok that it’s not smooth or uniformly mixed in. It’s ok to see random lumps of butter still not mixed in.

Transfer the dough onto a well-floured surface and gently, with floured hands, pat it down into a rough rectangle shape about 1-inch thick. Use a spatula and pick up one end of the dough and fold it over in half. Pick up the entire dough piece and turn it 45-degrees. Flour your hands and pat it down into another rectangle.  Repeat this patting, folding, turning method 4-5 more times. Keep flour dusted underneath the dough as you turn it.  For the last pat-down, make sure the rectangle is about 10-12 inches long and 6 inches wide. Transfer the dough to a sheet pan and cover. Refrigerate for at least 15 minutes to firm up the butter.

Use a 3 ½ -inch diameter biscuit cutter or round cookie cutter to cut the biscuits. Place the biscuits on a baking sheet lined with parchment paper. Press the scraps together and pat and fold to recombine the dough. DO NOT KNEAD THE DOUGH TOGETHER. Continue cutting out biscuits and reforming the dough until they are all cut. Refrigerate the biscuits for about 30 minutes to firm up the butter.

Just before baking, lightly brush the egg wash over the tops of the biscuits and sprinkle the tops with the turbinado sugar.

Bake for 20-25 minutes, or until the tops are browned and the insides are fully baked. The biscuits will be firm to the touch. Transfer the pans to a wire rack to cool.

Macerated Strawberries:

INGREDIENTS:

DIRECTIONS:

Macerate the sliced strawberries in a large bowl with 1 tablespoon of sugar. Let them sit for 15 minutes or keep covered in the fridge until ready to use. In our experience, strawberries taste best when they are cool, or at room temperature. We find that the chill from the refrigerator inhibits their flavor.

Crème Chantilly:

Makes 2 cups

INGREDIENTS:

  • 2 cups heavy whipping cream
  • 2 teaspoons vanilla extract
  • 2 tablespoons powdered sugar

DIRECTIONS:

 Whip the cream with vanilla extract and powdered sugar. Keep covered in the refrigerator until ready to use. Set all components aside until you are ready to serve.

Strawberry Shortcake and Whole Berries | www.dearmartini.wordpress.com

Broiled Grapefruit

Drunken Grapefruit

What could be better than grapefruit broiled with rum and brown sugar!

When I was a little girl my favorite Sunday brunches always included Broiled Grapefruit — “drunken grapefruit.” Mom would section the grapefruit and sprinkle them with rum and sugar. Dad would pop them under the broiler and be in charge of making sure they didn’t burn. To my young mind broiled grapefruit was the height of culinary perfection – just the right blend of sweet. sour, bitter, and my first taste of illicit rum.

sugar and spice

Broiled grapefruit are still a big hit in our house.  My only changes from the original recipe are–I prefer the complexity of brown sugar (or honey) to granulated sugar. I also like adding a pinch of cayenne to intensify the sweetness and a pinch of salt to mellow out the bitterness. The secret is all in the broiling. The heat of the broiler brings out the juices and melds all the components into a über-grapefruity, extra-juicy, deliciousness!

Broiled Grapefruit

Yield: Serves 2

Ingredients:

  • 1 large ruby red or pink grapefruit
  • 2 tablespoons rum (optional)
The secret is all in the broiling!

The secret is all in the broiling!

  • ¼ cup light or dark brown sugar
  • Pinch of salt
  • Pinch of cayenne

Directions:

Preheat the broiler and adjust your oven rack to about 4-inches from the broiler.

Cut grapefruit in half crosswise.  Cut a thin slice off the bottom of each half so they don’t wobble.

Use a paring knife to cut around each of the segments to release them from the membrane and pith.  It’s an extra step but really improves the eating experience. Sprinkle with rum.

In a small bowl, mix the sugar, salt and cayenne together.  Sprinkle the mixture over the grapefruit.

Broiled Grapefruit

I dare you not to lick the plate!

Place the grapefruit on a baking sheet and place under the broiler. Broil grapefruit until the sugar has melted, and grapefruit is bubbly and slightly brown, about 4 to 5 minutes.

Transfer broiled grapefruit to individual dishes and serve warm.

Tuscan Kale and White Bean Soup

We love hearty, delicious soups in the wintertime. :) Kudos to our Chef Terri for her guest post on Rantings of an Amateur Chef!

Rantings of an Amateur Chef

Today we have a great post from Terri from Dear Martini. Like Terri, I love a good hot soup on a cold winter’s day. Check out Dear Martini and Terri’s post below…

In the post-Holiday winter months, my food choices always lean towards soups that are hearty, nutritious, comforting and budget-friendly.  It might be due to the over-indulgence of food and wallet over the Christmas holidays; but regardless, it’s a great time to make soups to warm both the house and soul.

I stock my kitchen pantry with a variety of items that I can put together for a soup at a moment’s notice:  canned beans, canned tomatoes, frozen stocks, dried pastas and grains. During times when I have more vegetables languishing in the produce drawer than I have time to cook them, I dice them up and keep them in freezer bags.  That way, I’ve got pre-chopped veggies…

View original post 566 more words

Pumpkin Soup

This recipe comes with a very personal story.  And I dedicate this post to my lovely cousin, Sandra Bignardi who asked so nice and sweetly for the recipe.

Pumpkin is one of my favorite fall vegetables.  Ten years ago, when my husband and I were planning our wedding, I wanted to do something special and personal for our guests.  While discussing the reception dinner menu with our wedding planner, I spontaneously asked if the chef wouldn’t mind making my pumpkin soup recipe as the first course.  The chef happily agreed and the rest is history.  It warms my heart whenever relatives speak so fondly of that soup… even 10 years later.

*Be sure to hit the blue links to see the helpful videos we’ve made to guide you through the recipe.  As always, check us out on Vimeo or subscribe to our YouTube channel!

Chef Terri’s Pumpkin Soup

Serves 12

2 tablespoons extra virgin olive oil

2  large yellow onions, diced

3 large carrots, peeled and diced

1 cup dry sherry

8 cups chicken stock (or vegetable broth for a vegetarian recipe)

4 1-pound sugar pumpkins, roasted (yields about 3 pounds of roasted pumpkin)

1 cinnamon stick

2 bay leaves

1 teaspoon chopped thyme leaves

½ tsp ground nutmeg

1 teaspoon sherry vinegar

Kosher salt & freshly ground black pepper to taste

1/2 cup pomegranate seeds, for garnish

2 tablespoons chopped flat-leaf parsley, for garnish

To prepare the pumpkin:  Cut open the top of each pumpkin and scrape out the seeds and stringy pulp.  Prick the insides of the pumpkins with a fork and brush with canola oil.  Sprinkle with salt and pepper.  Place cut-side down on a baking sheet and roast in a 350℉ oven.  Roast for about 40 minutes or until soft.  Peel the skin off and then cube, or scoop out with a spoon and set aside.

In a large soup pot, heat the oil over medium heat.  Add the onions and carrots.  Cook, stirring occasionally, until tender, but not browned, 10-12 minutes.   Add sherry and cook until liquid evaporates, 3-5 minutes.  Add chicken broth, pumpkin, cinnamon stick, bay leaves and thyme.  Bring to a boil; reduce heat and simmer, uncovered, until veggies are tender, 35 – 45 minutes.  Remove bay leaves and cinnamon stick.

In a blender or food processor, puree vegetable mixture in 4 batches. To achieve that velvety, silky texture, strain the soup through a fine-mesh sieve or chinois.  Return to the soup pot and warm over low heat.  Add nutmeg, vinegar and season with salt and pepper.

Ladle soup into warmed bowls and garnish with pomegranate seeds and parsley.


Tale of Two Salads

If all you are required to bring to your hosts’ house for Thanksgiving this year is a salad to add to the menu, consider preparing one of these beautiful versions that celebrate the most amazing flavors fall has to offer.

One serves as a hearty first-course salad; the other a nice palate-cleanser.

Remember this great vinaigrette video?  It certainly comes in handy for these salads!

*Be sure to hit the blue links to see the helpful videos we’ve made to guide you through the recipe.  As always, subscribe to our YouTube channel!

Spinach with Warm Bacon Vinaigrette

Serves 4 to 6

4 slices thick-cut bacon, cut into 1-inch pieces

½ cup extra virgin olive oil

½ teaspoon stone-ground mustard

¼ teaspoon minced shallot

¼ cup white balsamic vinegar

¼ teaspoon thyme leaves, chopped

Kosher salt and freshly ground black pepper

1 Granny Smith Apple, diced

1 cup walnut halves, toasted

¼ cup dried cranberries

4 cups baby spinach leaves, washed and spun dry

¼ cup crumbled bleu cheese

Cook the bacon:  In a medium skillet over medium flame, cook the bacon until crispy.  Transfer the bacon to a plate lined with paper towels and set aside.

Make the vinaigrette:  Pour as much of the bacon grease into a clean glass measuring cup and add additional olive oil to make up ¾ cup.  Set aside.

In a small bowl, whisk together the mustard, shallot, vinegar and thyme.  Add a pinch of kosher salt and freshly ground black pepper.  Pour the oil mixture in a thin, steady stream as you whisk the vinegar mixture together.  Alternatively, you can add all of the ingredients into a jar and shake vigorously.

Assemble the salad: In a large bowl, toss together the bacon, diced apple, walnuts, dried cranberries and spinach with a drizzle of the vinaigrette. Taste and season with salt and pepper.

Divide the salad evenly among the serving plates and top with the bleu cheese.

Frisee with Orange and Pomegranate and Hazelnut Vinaigrette

Serves 4 to 6

¼ cup sherry vinegar

½ teaspoon Dijon mustard

½ teaspoon minced shallot

¼ teaspoon minced thyme leaves

Kosher salt and freshy ground black pepper

½ cup hazelnut oil

¼ cup vegetable oil

1 head frisee lettuce, trimmed

2 navel oranges, segmented

½ cup pomegranate seeds

½ cup hazelnuts, toasted and skinned

Make the vinaigrette:  In a mixing bowl, combine the vinegar, mustard, shallot, thyme and salt and pepper.  Mix together until smooth.  In a slow, steady stream, pour in the oils while whisking constantly until the vinaigrette is thickened.  Set aside.

In a large mixing bowl, combine the frisee, orange segments and half the pomegranate seeds.  Toss with ¼ cup of the dressing and salt and pepper.  Evenly divide the salad among the serving plates and top with the remaining pomegranate seeds and the hazelnuts.

Happy Thanksgiving!

The Rules of Carving Club — Turkey Carving for Rock Stars

Welcome to Carving Club.

The First Rule of Carving Club is you do not carve at the table.

The Second Rule of Carving Club is– YOU DO NOT CARVE AT THE TABLE.

Carving the turkey is a big deal, so please be the Thanksgiving ROCK STAR you are and carve in the kitchen.  YOU DO NOT want to waste all that time brining, roasting and preparing that beautiful Thanksgiving turkey only to hack it into chunks.

The lovely scene depicted and  immortalized in Norman Rockwell’s Freedom from Want, has given you the wrong idea.  While it might seem like a great idea to carve at the dining room table in front of your admiring guests; for many reasons, it’s not. For one, it can be nerve-wracking — it’s a live performance with sharp knives in front of family and friends who will mock you at your every move.  For another, the mess — if you’re not the most scrupulously skilled surgeon, the juices may stain your tablecloth, your shirt and whomever is sitting nearest to you.   Lastly, from a culinary perspective, it’s the wrong way to slice turkey — slicing the meat while still on the bone forces you to cut with the grain of the meat rather than against it (and we all know that’s a culinary cardinal sin).  And if you look closely at the painting, the turkey is being presented and appreciated… not carved. 

You can still have that Norman Rockwell moment by bringing out your beautiful bird and presenting it to your guests — just do it before whisking it back to the kitchen to carve following the steps below.  Good luck – we know you’ll be great!

*Be sure to hit the blue links to see the helpful videos we’ve made to guide you through the recipe.  As always,  subscribe to our YouTube channel!

Happy Thanksgiving!