Thanksgiving Traditions…The Good, The Bad, and The Ugly


Homemade Jellied Cranberry Sauce | Dear Martini

Thanksgiving is all about tradition… good and bad.  In Chef Mia’s house we have the Dilemma of the Cranberries.  Artist husband grew up on canned cranberry sauce and loves it like nobody’s business.  He even claims it is an essential part of the Norman Rockwell painting.  Chef Mia thinks otherwise.  How to keep peace in the family? Compromise solution: Homemade Jellied Cranberry Sauce

Ingredients for Cranberry Sauce | Dear Martini

What she came up with is a delicious compromise.   A recipe catering to his tastes and still beautiful enough and made with simple fresh ingredients for her.  Sometimes it’s time to adopt new traditions.

Jellied Cranberry Sauce

Makes 4 cups

2 packets unflavored gelatin

2 (12-ounce bags) fresh or frozen cranberries, washed and sorted

1 Granny Smith apple, small diced

1 navel orange, zest removed in strips and juiced

1 cup granulated sugar

Special Equipment: Food mill and 4 cup decorative mold

Place cranberry juice in a small bowl; sprinkle the gelatin over the surface of the juice and let sit for at least 5 minutes. Meanwhile, in a deep saucepan, combine the cranberries, apple, orange zest & juice, and sugar. Bring to a boil; reduce the heat and simmer stirring often until the cranberries begin to pop about 5 minutes. Continue cooking an additional 3 to 5 minutes until the mixture begins to thicken. Turn off the heat and stir in the softened gelatin.

Transfer the berry mixture to a food mill and pass through the finest holes into a bowl. (Discard the solids in your compost) Transfer the berry mixture to a lightly oiled mold. Top with a piece of oiled plastic wrap placed directly on top of the jelly. Refrigerate until set, at least 4 hours. (Can be made several days ahead)

To unmold, dip briefly in a bowl of hot water. Using a spatula, press gently on one side of the jelly (placing the spatula between the side of the mold and the jelly) to release the vacuum seal. Then turn out onto a plate. Refrigerate until ready to serve.

Cranberry Sauce Recipe | Dear Martini

Dearest Readers, We are so very thankful for each and every one of you who have supported us all year.  We love hearing from you and when you share with us.  Please share your favorite dish with us here or on Facebook!  We’d love to hear from you.

Happy Thanksgiving!

xxoo Mia and Terri


Yammy Gobblers

Yammy Gobblers - Yams Dressed Up Like Turkeys

We’re sure every family has a Thanksgiving tradition — whether it’s your Aunt Carol’s Walnut-Celery Jello Ring or your Mummy’s Famous Pecan Pie.  At Chef Terri’s house, the Yammy Gobblers take center stage alongside the Stuffed Pumpkin and the turkey (of course).

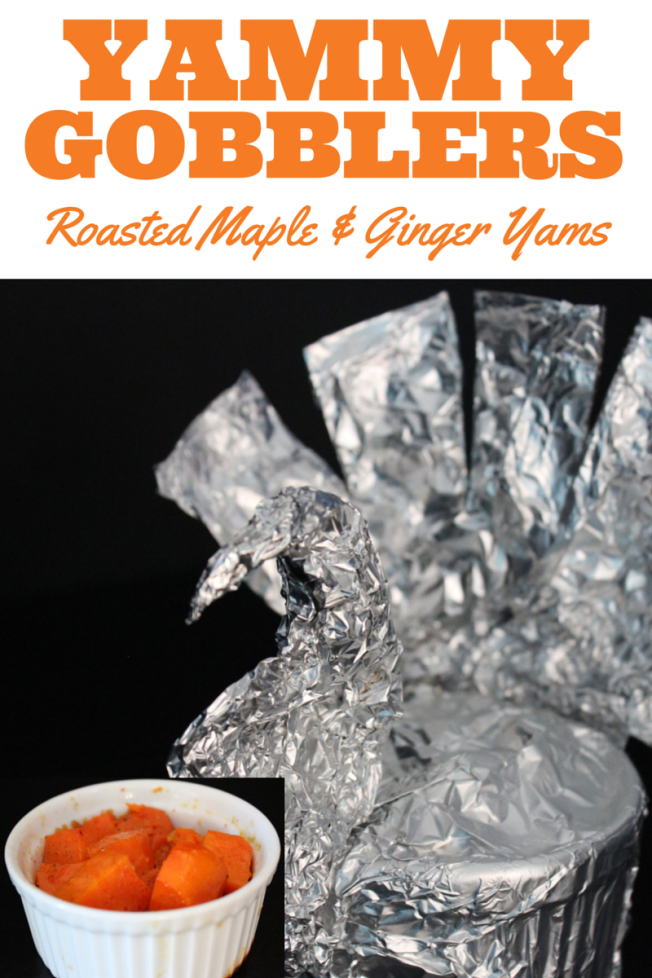
Every tradition has a beginning.  These roasted yams, wrapped in foil shaped to resemble a turkey, were inspired from a childhood memory:

Imagine it’s 1977, and your 7-year-old self has just had dinner with your parents at Smith & Wollensky in New York.  You weren’t able to finish your entire meal, so your friendly waiter offers to pack up your leftovers into a Bowser Bag.  You nodded, from the goading of your parents; and your obedience was rewarded with the presentation of your leftovers wrapped in aluminum foil shaped like a bright and shiny magical swan.  Breathless, you thanked your waiter for the lovely and elegant prize which you cradled in your hands all the way home to place in the fridge.  (and then the next day you wept bitterly when you discovered your dad satisfied his midnight craving by finishing off your meal, and left the ripped up remains of the beautiful swan on the counter for you to find in the morning).

But we digress.

Chef Terri pays homage to her beloved foil swan by featuring Yammy Gobblers on the Thanksgiving Feast menu.  You can use any roast yam or sweet potato recipe you like; Chef Terri roasts yam with aromatic ingredients like orange zest and cinnamon in ceramic ramekins and wraps the packages up in foil shaped like turkeys.  The presentation can be downright adorable.  According to one family member, it’s not Thanksgiving unless the Yammy Gobblers are served.

Sure, it’s cheesy, but it’s tradition.  Who’s going to mess with tradition?


Yammy Gobblers

Serves 6 to 8

4 medium-sized yams, peeled and 1/2-inch diced

Zest and juice of 2 navel oranges

1 tablespoon grated ginger

1/4 cup Maple syrup (grade B – or the darkest color you can find)

1 stick (8 tablespoons) unsalted butter, softened to room temperature

pinch each of kosher salt and freshly ground black pepper

1/2 teaspoon ground cinnamon

pinch freshly grated nutmeg

Special Equipment:

  • 6-8 4-ounce ramekins
  • heavy duty aluminum foil
  • baking sheet


Preheat the oven to 425 ℉

Butter each ramekin all over the insides and bottom and set aside.

In a mixing bowl, toss the yams with the orange juice, zest, ginger, syrup, salt, pepper, cinnamon and nutmeg until the yams are well coated.  Evenly divide the mixture among the prepared ramekins.

Wrap each ramekin with a sheet of foil, folding and crimping each end to represent the turkey’s head, neck and tail.  Cut the fringes on the tail to represent the tail feathers.

Place the turkeys on a baking sheet and bake for 20 – 30 minutes, or until fragrantly caramelized.  The yams are done with a knife inserted into one slides in with no resistance (though you’ll have to unwrap a sacrificial turkey to test that!)

Allow the turkeys to cool slightly for about 15 minutes before serving (if the turkeys are too hot, the steam escaping from them when you open them may burn you).  Let each guest unwrap his own yammy gobbler.  The aroma from the steam coming out is quite heady.


Yams in Ramekins Dressed Up Like Turkeys with Dear Martini


Fennel Fanatics


Everything you need to know about fennel | Dear MartiniBack in our days teaching at Draeger’s Cooking School, we bonded over our love for fennel.  We used to joke that one day we would create a cooking class entitled, “I Love Fennel.”  It was a silly idea, but it was certainly a class we would take ourselves.

Fennel bulb top shot Dear MartiniWhy do we love fennel so much?  It’s versatile, available year round (we are so lucky to live in California), and it goes well with the California/Mediterranean style of cuisine we enjoy. We roast fennel with meats, shave it for salads, braise it or cook it in soups, and even throw it on the grill.  It’s sweet, licorice flavor is subtle enough to compliment pork, chicken and fish and goes beautifully into hearty dishes like ratatouille, our Thanksgiving stuffing, or a comforting soup.  When raw, it’s crunchy texture lends well to slaws and salads; in fact, one of our favorite salads of all is a simple combination of shaved fennel, shredded carrot and dried cranberries.

If you are new to fennel, we suggest you start off with this delicious soup.  It’s a hearty soup perfect for cooler months and we hope will inspire you to add fennel to your other favorite recipes.

Be sure to click on the blue links to watch our bite-sized technique videos.  And let us know what you think!

bean soup

Tuscan Kale and White Bean Soup

Serves 4 to 6


3 tablespoons extra virgin olive oil

½ yellow onion, diced

1 carrot, peeled and diced

2 stalks celery, diced

½ bulb fennel, cored and diced

3 cloves garlic, peeled and minced

½ teaspoon crushed red pepper flakes (to taste)

1 teaspoon kosher salt

½ teaspoon freshly ground black pepper

1 15-ounce can white beans (or cannellini beans), drained and rinsed

3 cups chicken stock, or vegetable stock

1 Parmigiano-Reggiano cheese rind (optional)

3 cups (1 bunch) Tuscan Kale, chopped

2 tablespoons shredded Parmigiano-Reggiano cheese, for garnish

In a medium-sized soup pot, heat the olive oil over medium flame and add the onion, carrot, celery, fennel and garlic.  Season with salt and pepper and toss around to coat with oil.  Cover and let the vegetable become soft and tender, but not browned, for about 7 minutes.  Stir occasionally.  Uncover and add the pepper flakes and beans and toss to coat.  Cook until the beans are hot, about 2 more minutes.  Pour in the stock and bring to a boil.

Lower the heat to simmer and add the Parmigiano rind, if using.  Simmer for 15 minutes, covered.  Uncover and add the kale. Stir to combine the ingredients and simmer, covered, for another 8 minutes, or until the kale is soft and tender.  Taste and season with more salt and pepper if needed.

Ladle into warmed soup bowls, top with cheese and serve hot.

Fennel_Bulb_Dear_Martini


Panzanella Salad – Heirloom Tomato and Bread Salad

Ripe heirloom tomatoes make the best panzanella salad

Welcome to Tuscany!  Panzanella is a traditional Tuscan salad usually consisting mainly of stale bread and tomatoes.  We know it may seem strange to use stale bread, but this dish ingeniously takes advantage of rock-hard-day-old-bread, turning it into a tasty treat.  It’s also a great way to enjoy fresh vegetables – especially heirloom tomatoes which are abundant during the late summer months.

A variety of heirloom tomatoes and rustic loaf croutons make the best panzanella salad

For the bread, panzanella is made with a country-style loaf, like that found in Tuscany. Any rustic Italian loaf of bread from pugliese to ciabatta or even a French sweet baguette or batard (heresy!) will do as long as it’s at least one day old.   While the Tuscans claim it, you will find many variations of panzanella throughout central Italy with varying ingredients according to the region.   Every cook has her version of it. We prefer to toast the bread before letting it soak in the vinaigrette, giving the bread a little more flavor and texture.   If the last weeks of summer are still too hot to fire up the oven, consider leaving the bread out to dry in the sun for a couple of hours.  It’s a lovely entrée salad that requires no cooking!

Heirloom Tomato Basket

When choosing tomatoes, heirloom or otherwise, pick tomatoes that have vibrant color and are a bit soft.  Large, firm, heavy tomatoes tend to have lots of water in them and therefore lack intense tomato flavors.  Dry farmed or older, softer tomatoes tend to have less water and more flavor.

With the best of summer ingredients, hearty bread, and homemade vinaigrette,  panzanella is a delicious way to celebrate late-summer flavors!  Watch our short little video on how we made panzanella right on our front lawn… and while you’re at it, hit the hotlinks we’ve given you in the recipe below to watch our other cooking technique videos!

Panzanella – Heirloom Tomato and Bread Salad

Serves 6 to 8

Break out your best extra virgin olive oil to really make all of the simple flavors in this dish shine!

1 day-old rustic loaf , cut into 1-inch cubes

1 clove garlic, peeled and minced

1 small shallot, minced

4 tablespoons red wine vinegar

½ cup extra virgin olive oil

Kosher salt and freshly ground black pepper

4 ripe heirloom tomatoes, sliced, diced and or cut into wedges

1/2 cup ripe cherry tomatoes, sliced in half lengthwise

½ bunch basil leaves, torn into pieces

½ red onion, lyonnaise

Kosher salt and freshly ground black pepper

Preheat the oven to 350°F.  Make the croutons by arranging the bread cubes in a single layer on a sheet pan and lightly toast the bread in the preheated oven for 10 minutes.  Remove from the oven, sprinkle with a pinch of kosher salt and half a pinch of ground black pepper.  Set aside to cool.

In a jar with a tight-fitting lid, combine the garlic, shallot, vinegar, olive oil and a pinch each of salt and pepper.  Screw the lid on tightly and shake vigorously to combine.  Set aside.

In a large mixing bowl, toss the dressing together with the bread, tomatoes, basil and red onions.  Refrigerate the salad for 20 minutes for the flavors to develop.  Serve cold or at room temperature.

Want to get creative?  While not traditional, try adding any one (or all ) of these ingredients:

Panzanella Salad is a delicious idea for dinner when it's too darn hot to turn on the stove!

Tuscan Kale and White Bean Soup

We love hearty, delicious soups in the wintertime. :) Kudos to our Chef Terri for her guest post on Rantings of an Amateur Chef!

Rantings of an Amateur Chef

Today we have a great post from Terri from Dear Martini. Like Terri, I love a good hot soup on a cold winter’s day. Check out Dear Martini and Terri’s post below…

In the post-Holiday winter months, my food choices always lean towards soups that are hearty, nutritious, comforting and budget-friendly.  It might be due to the over-indulgence of food and wallet over the Christmas holidays; but regardless, it’s a great time to make soups to warm both the house and soul.

I stock my kitchen pantry with a variety of items that I can put together for a soup at a moment’s notice:  canned beans, canned tomatoes, frozen stocks, dried pastas and grains. During times when I have more vegetables languishing in the produce drawer than I have time to cook them, I dice them up and keep them in freezer bags.  That way, I’ve got pre-chopped veggies…

View original post 566 more words

The Plentiful Pumpkin

The Vegetarian Thanksgiving —  it’s a topic that’s coming up more often now.  Years ago, if a vegetarian came to Thanksgiving dinner, all he or she could hope for was to enjoy some of the meatless side dishes, salads and of course pumpkin pie.  In more recent years, folks are becoming more health-conscious and in general adopting a meat-free lifestyle.  A happy consequence:  dinner hosts are also becoming more conscientious and planning for more meatless options for the Thanksgiving Table.

I originally developed this for my sister, Alex.  I wanted to make something unforgettably special for her that was filling, delicious and healthy… something that would be so special, she wouldn’t miss having turkey at all.

As I heartily encourage you to make this recipe, I am obligated to warn you:  it’s not something that can be quickly thrown together.  This recipe is for a very special occasion, so please take the necessary time and steps to prepare.  Cook and season each component before it gets mixed together as the filling – by doing so, each component has its own flavor.  The whole thing will become greater than the sum of its parts!  (and consequently, that’s why it’s so darn complicated to make this dish).

I serve this pumpkin with onion gravy (it looks and tastes like turkey gravy but it’s vegan) and a side of cranberry sauce!

* Be sure to click on the blue links to see all the helpful videos we’ve prepared to guide you along!  Subscribe to our YouTube Channel!  

Stuffed Thanksgiving Pumpkin

Serves 4

4 sugar pumpkins, about 6 to 8-inches in diameter

Olive oil

Kosher salt

Freshly ground black pepper

2 cups cooked Israeli couscous (or wild rice)

1 cup cooked quinoa (red looks better)

1 cup dried cranberries, roughly chopped

1 cup hazelnuts, toasted and skinned

2 tablespoons chopped parsley

Sub-recipes:

Sautéed Dino Kale w chopped garlic and red pepper flakes

Sautéed Brussels Sprouts with shallots and garlic (thinly slice the shallots and garlic)

Sautéed chickpeas with diced carrots, minced garlic and olive oil (optional)

Roast the pumpkins by first cutting their tops off and scooping out their seeds and strings.  Prick all over the inside of the pumpkins with a fork and brush with olive oil.  Season the insides with salt and pepper.  Place the pumpkins cut-side down on a foil-lined baking sheet and roast in the oven for 35 min at 350.  Remove and set aside to cool.

Prepare the filling:  In a large bowl mix together the cooked couscous, quinoa, cranberries, nuts, parsley and any of the prepared sub-recipe components (mix 1 – 1 ½ cups of each component).  Season with salt and pepper and moisten with vegetable stock.

Stuff each pumpkin with the filling – making sure you’ve firmly (but not compressed) packed it in.  Make sure it comes over the top.  Return the stuffed pumpkins to the foil-lined baking sheet and bake until heated through, about 45 minutes.  You can roast the tops of the pumpkins, too and place on top for presentation.  Bake any leftover filling in a baking dish to serve along side.

Serve hot with lots of onion gravy and cranberry sauce.

Onion gravy:

Makes 2 ½ cups

2 tablespoons extra virgin olive oil

One large yellow onion, diced 

Kosher salt and freshly ground black pepper

2 cups water

2 tablespoons Tamari sauce (or low-sodium soy sauce)

1 vegetable boullion cube

2 teaspoons cornstarch, mixed w cold water to create a slurry

In a medium-sized saucepan, heat the olive oil over medium-high flame and sauté the onions until soft, about 7 minutes.  Season with salt and pepper.  Add the water, tamari, and boullion cube.  Cover and bring to a boil.  Reduce the heat to simmer and simmer for 25 minutes, or until the onion is clear.  Mix together the cornstarch slurry and pour in.  Bring to a boil, stir a few times until the gravy thickens and turn off the heat.  Set aside for a few minutes to cool slightly, then puree with a stick blender.  If you are using a traditional blender, cool the gravy down completely before blending (you’ll have to heat the gravy back up).  Strain the gravy into a clean saucepan, taste and season with salt and pepper if needed and keep warm until ready to use.

Happy Thanksgiving!

Pumpkin Soup

This recipe comes with a very personal story.  And I dedicate this post to my lovely cousin, Sandra Bignardi who asked so nice and sweetly for the recipe.

Pumpkin is one of my favorite fall vegetables.  Ten years ago, when my husband and I were planning our wedding, I wanted to do something special and personal for our guests.  While discussing the reception dinner menu with our wedding planner, I spontaneously asked if the chef wouldn’t mind making my pumpkin soup recipe as the first course.  The chef happily agreed and the rest is history.  It warms my heart whenever relatives speak so fondly of that soup… even 10 years later.

*Be sure to hit the blue links to see the helpful videos we’ve made to guide you through the recipe.  As always, check us out on Vimeo or subscribe to our YouTube channel!

Chef Terri’s Pumpkin Soup

Serves 12

2 tablespoons extra virgin olive oil

2  large yellow onions, diced

3 large carrots, peeled and diced

1 cup dry sherry

8 cups chicken stock (or vegetable broth for a vegetarian recipe)

4 1-pound sugar pumpkins, roasted (yields about 3 pounds of roasted pumpkin)

1 cinnamon stick

2 bay leaves

1 teaspoon chopped thyme leaves

½ tsp ground nutmeg

1 teaspoon sherry vinegar

Kosher salt & freshly ground black pepper to taste

1/2 cup pomegranate seeds, for garnish

2 tablespoons chopped flat-leaf parsley, for garnish

To prepare the pumpkin:  Cut open the top of each pumpkin and scrape out the seeds and stringy pulp.  Prick the insides of the pumpkins with a fork and brush with canola oil.  Sprinkle with salt and pepper.  Place cut-side down on a baking sheet and roast in a 350℉ oven.  Roast for about 40 minutes or until soft.  Peel the skin off and then cube, or scoop out with a spoon and set aside.

In a large soup pot, heat the oil over medium heat.  Add the onions and carrots.  Cook, stirring occasionally, until tender, but not browned, 10-12 minutes.   Add sherry and cook until liquid evaporates, 3-5 minutes.  Add chicken broth, pumpkin, cinnamon stick, bay leaves and thyme.  Bring to a boil; reduce heat and simmer, uncovered, until veggies are tender, 35 – 45 minutes.  Remove bay leaves and cinnamon stick.

In a blender or food processor, puree vegetable mixture in 4 batches. To achieve that velvety, silky texture, strain the soup through a fine-mesh sieve or chinois.  Return to the soup pot and warm over low heat.  Add nutmeg, vinegar and season with salt and pepper.

Ladle soup into warmed bowls and garnish with pomegranate seeds and parsley.


I say Stuffing… and you say Dressing

And so the perpetual battle rages on:  Stuffing vs. Dressing.  Which is it?  The customary side dish to the Thanksgiving Turkey really can be either; depending from where you hail.  Most folks from the Northern states call it stuffing.  The Southern states call it dressing.  And those in the Midwest and Western states pretty much just go along with what it was traditionally called down through the generations.  But regardless of where you’re from and whichever you call it, the traditional Turkey Sidekick is almost always a savory recipe prepared with seasoned bread croutons or cornbread and mixed with vegetables such as carrots, onions and celery.  Depending on where you are,  nuts, dried fruits and herbs also make an appearance.

So why call it stuffing or dressing?  Who still stuffs the turkey, anyway?   Is it called dressing if it’s not stuffed inside?  Why do we make a dressing and stuff it inside a turkey, which then becomes a stuffing for the turkey?  Can I make a stuffing without stuffing it into the bird?  Or would that be called dressing?  But didn’t you just ask if the dressing BECOMES the stuffing?   WHY IS THIS SO COMPLICATED? 

Relax, people.  Please.

We call it stuffing (but for those of you who want to think of it as dressing, be our guest) and bake it in a dish to serve with the turkey.  We do not serve anything that’s been stuffed inside a turkey.  Stuffing a turkey  with stuffing/dressing increases the turkey’s cooking time — which might lead to over-cooking the bird (have you ever choked on dry breast meat?) or undercooking the center.  Either way, over-cooked turkey or salmonella-laced stuffing/dressing are two avenues we’d rather avoid this holiday.

Try our cornbread stuffing.  Make the cornbread in a jiffy, using the famous blue and white box!  This heart-warming, food-coma-inducing stuffing recipe is a hands-down winner in our recipe box. The toasty fennel seeds add a spicy sweetness that the tart apple and dried cranberries pick up. Make sure to make extras – there are almost no leftovers from just one dish.

*Be sure to hit the blue links to see the helpful videos we’ve made to guide you through the recipe.  As always,  subscribe to our YouTube channel!

Apple, Fennel Seed and Cornbread Stuffing

Serves 6 to 8

1 teaspoon fennel seeds
1 tablespoon unsalted butter for buttering casserole, + 2 tablespoons to saute
2 yellow onions, diced
3 cloves garlic, minced
3 stalks celery, diced
1 large Granny Smith apple, diced
6 cups prepared cornbread, cut into 1-inch cubes
2 tablespoons flat-leaf parsley, chopped
1 cup dried cranberries, optional
2 teaspoons kosher salt
½ teaspoon freshly ground black pepper
2 large eggs, beaten
½ cup low-sodium chicken stock
2 tablespoons unsalted butter, cut into 8 small pieces for dotting the casserole

In a small skillet over medium-low heat, toast the fennel seeds until they are warm and fragrant, about three minutes.  Set aside to cool.

Preheat oven to 350°F.  Butter the inside of a 13×9-inch gratin dish with 1 tablespoon butter and set aside.

In a large sauté pan, heat 3 tablespoons of butter and sauté the onions over medium heat until translucent, about 7 minutes.  Stir in the garlic, celery, apple and fennel seeds and cook an additional 5 minutes.  Remove pan from heat and set aside to cool.

Toss the vegetable mixture with the cornbread, parsley and cranberries in a large bowl.  Season stuffing with salt and pepper.  Taste and adjust seasoning to taste as necessary.  Stir in the eggs.  Add as much stock as needed to moisten the stuffing but not make it soggy (you may not need all of the stock).  Place stuffing in prepared gratin dish and dot with the remaining 2 tablespoons of butter on the top.  Cover the casserole with foil and bake for 45 minutes or until warmed through.  Remove foil and continue baking an additional 5 to 10 minutes until top of stuffing is golden brown.

To Make Stuffing Ahead: Bake cornbread 2 days before Thanksgiving.  Assemble stuffing the day before in the baking dish, then wrapped tightly in plastic wrap and refrigerated for up to 24 hours before baking. To bake, remove stuffing from the refrigerator 30 minutes before baking.  Cover the casserole with foil and bake for 45 minutes or until warm through.  Remove foil and continue baking an additional 5 to 10 minutes until top of stuffing is golden brown.


Creative Additions:
Add one or more of the following

1 cup chopped chestnuts,

1 cup chopped pecans,

½ cup roasted garlic cloves,

2 tablespoons chopped sage,

½ pound mushrooms, sliced and sautéed,

½ pound cooked bulk Italian sausage, crumbled

2 tablespoons brandy

Happy Thanksgiving!

Aioli

What is Aioli?

Aioli is a garlicky homemade mayonnaise that comes to us via the Mediterranean.

Quick + Inexpensive  + Versatile + Big Bang Taste!

4 Reasons to Love Aioli:

  1. Quick – 2 minutes to pound the garlic + 5 to whisk &  you’re done.
  2. Inexpensive  – Made with ingredients almost everyone has on hand without making a special trip to the store so you can whip a batch on a whim.
  3. Versatile – It’s a sauce, that’s a dip, that’s a spread, that’s a condiment — you gotta love that!  Pair it with beef & lamb, fish & shellfish, potatoes and veggies, pretty much anything else except chocolate ice cream!
  4. Big Bang Taste! – Who doesn’t love a garlicky-lemony sauce?!  If you are looking for a little variety — try a tablespoon of minced basil, chives or green onions, mint, parsley or lemon zest.

The Secret

You may be thinking to yourself — “Can’t I just mix some mayo with garlic and call it aioli?” Sure you could “doctor up” store bought mayo in a pinch, but it doesn’t compare to the real deal. The secret to aioli is all in the hand whisking.  Whisking the sauce by hand creates a silky smooth mouthfeel that can’t be replicated by a machine (believe me I’ve tried!)  Watch closely in our videos for tips to help you conquer whisking.  Once you get the hang of it, it’s really quite easy to make.

Aioli
Yields 1 cup

We recommend a mellow extra-virgin olive oil or a combination of oils for best flavor.  Save your peppery Tuscan-style olive oils for another use as they tend to overwhelm aioli.

(All ingredients should be at room temperature)

  • 1 large egg yolk
  • 1 teaspoon sherry or white balsamic vinegar
  • Kosher salt and freshly ground black pepper
  • 1 cup extra-virgin olive oil (or a mix of ½ cup pure olive oil or peanut oil with a 1/2 cup extra-virgin olive oil for a lighter aioli)
  • 1 teaspoon garlic paste
  • Juice of a half lemon

In a small bowl, beat the egg yolk with vinegar and a pinch of salt and pepper until combined.

Add the oil to the beaten egg yolk, drop by drop, whisking constantly for about the first 2 tablespoons of oil until the mixture begins to thicken.  As the aioli begins to thicken, the oil can be poured a little faster in a thin steady stream.   If the mixture becomes too thick to whisk, add a little of the lemon juice or water to thin it out and continue to whisk and incorporate oil.  Stir in the lemon juice and garlic paste to suit your taste (you may not need all of it.)

Cook’s Notes:  Aioli can be stored for up to 3 days in the fridge but is better made and served the same day.  If you plan to serve aioli on a buffet or at a picnic place your bowl of aioli in a bowl of ice to keep it cool and safe.

Still Not Sure What to Pair Aioli With? How About Artichokes?

Happy 4th of July!

Mia & Terri

ALL ABOUT ASPARAGUS

We’ve all got our favorite ways to use asparagus — steamed,  sautéed, blanched, sliced, in soups, in risottos, chilled in salads, with aioli, with lemon zest, in an omelet, tossed in pasta, dipped in tempura batter and fried…

…but my hands-down favorite is:  Flash-roasted!

If you didn’t already love asparagus because it’s delicious, get ready to love it even more for what it can do for you!  Asparagus is low in calories… about 20 calories for a 3-ounce serving. Despite its low cal reputation, asparagus packs a huge punch in the nutrient-density department:  it’s a good source of vitamins A, B6, C, E, K, thiamin, riboflavin, niacin, folic acid, iron, potassium and chromium.  Not to mention it’s a great source for dietary fiber!

At the market, choose your asparagus carefully.  Asparagus is usually sold in one-pound bunches.  Make sure you select the stalks that are straight, smooth and bright green with tight, compact bud tips (mushy tips mean trouble – they’ve been sitting around too long).  Remember, the fresher the asparagus, the more nutrients it still has to offer.  Also, avoid the really thick stalks.  You might think you’re getting more value for your money by buying a bigger size, but in this case, the smaller, the better.  We prefer stems that are pencil thin to dime-sized in diameter.  Thicker stems can be tough, woody and bitter.

Two Asparagus Recipes

Blanched and Sauteed Asparagus w Lemon Zest

(serves 2)

Ingredients:

  • 1 pound asparagus, trimmed and blanched
  • 3 tablespoons extra virgin olive oil
  • generous pinch kosher salt
  • generous pinch freshly ground black pepper
  • zest of one lemon
  • 1/2 teaspoon white balsamic vinegar

Directions:

In a medium-sized saute pan, heat the olive oil over medium flame and add the blanched asparagus.  Saute until the asparagus is heated through, about 5 minutes.  Season with salt and pepper.  Turn off the heat and toss in the lemon zest and vinegar.  Serve immediately or chilled.

Flash-Roasted Asparagus

(serves 2)

Ingredients:

  • 1 pound asparagus, trimmed
  • 3 tablespoons olive oil
  • generous pinch kosher salt
  • generous pinch freshly ground black pepper

Special Equipment:

  • Baking sheet lined with aluminum foil
  • Oven mitts

Directions:

Preheat the oven and a foil-lined baking sheet to 500℉ for about 30 minutes.  It’s best if the oven is ROCKET HOT before you begin preparing the asparagus.

Toss the asparagus in a bowl with the olive oil salt and pepper.

When the oven is sufficiently hot enough to sizzle even the smallest drop of water on the baking sheet, quickly toss the seasoned asparagus onto the baking sheet and close the oven door.  ROAST FOR 3 minutes (or until the smoke starts to set off your smoke detector.)

With the oven mitts, remove the baking sheet from the oven and roll the asparagus around.  Return to the oven and roast for another 2-4 minuts, or until the asparagus is tender.

Serve immediately.

This flash-roasting technique is great for when you’re pressed for time but still want something beautifully-cooked and delicious to go with dinner.  And this method is also great to use on green beans, baby Brussels Sprouts, radishes, zucchini and eggplants!